

Tonight I'll be teaching you two things: 1) how to create your own nativity snowflake cut file similar to the above wood veneer ornament I bought from JoAnn's (so you can understand how to combine various fonts and cut files to achieve something specific you're looking for), and 2) how to create a album insert with quote similar to the grinch quote that I made as a cut file above. I used a different quote in what I'll call my 'wordy insert cut file' ("we wish you a merry christmas, we wish you a merry christmas, we wish you a merry christmas and a happy new year") just to keep the tutorial shorter.
First off, to back up a bit, all the information in this two part tutorial will be using Silhouette Studio software. I have version 2.8.16 (which I realize is old). I did a LOT of research before I bought a die cutter and I wanted a machine that would allow me to draw my own illustrations, build things out of simple shapes, or cut out text using my favorite fonts. Several years ago I bought a Craft Robo (which was the original machine Silhouette bought out and re-branded, and now charges a LOT more for! ACK!), and use the Silhouette Studio software to design all my cut files.
I'd love to tell you all about my favorite things to cut on my craft robo, but since I know you're here for the tutorial, I'll get right to it, and we can chat later ;) Keep in mind, if you get stuck at ANY POINT in this process, feel free to reach out to me. I LOVE to help other crafters and be an enabler to all things crafty! The possibilities are truly endless with what you can do with this machine!
PART 1: NATIVITY SNOWFLAKE
Pre-work:
- Go to http://vectorink.com/holiday/snowflake-0013/ and download the ‘Snowflake 0013’ cut file.
- Go to http://www.fontspace.com/su-lucas/sl-christmas-silhouettes and download and install the ‘SL Christmas Silhouettes’ font.
Process Steps:
- Open a new file in Silhouette Studio. Save the file as ‘Nativity_Snowflake.studio’
- Open your 0013.dxf file in Silhouette Studio, select the snowflake, and copy it.
- Paste the snowflake into your ‘Nativity_Snowflake’ Silhouette Studio File.
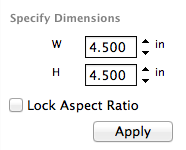
- Along the top menu bar, select to ‘open the scale window’.

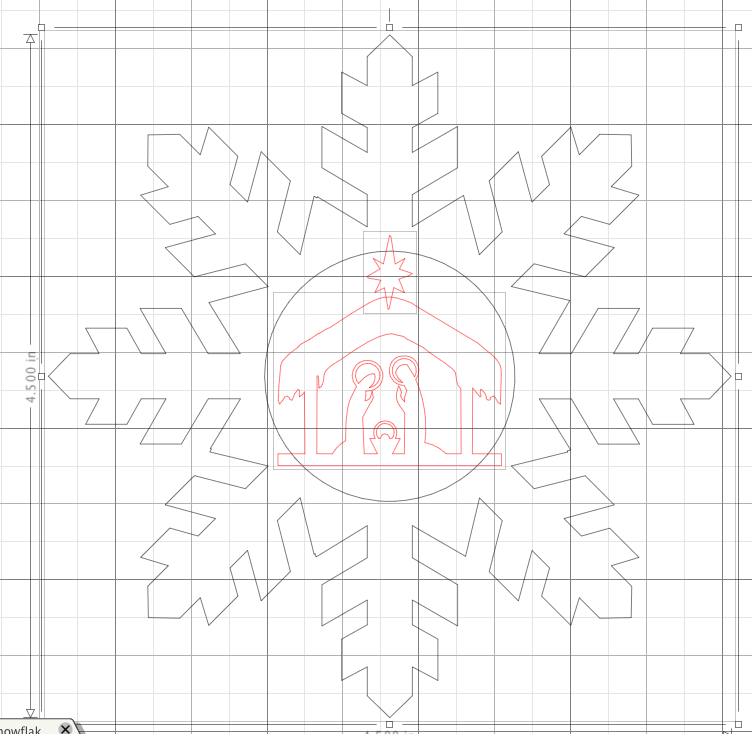
- Make sure the snowflake is selected, and change the dimensions to 4.5” x 4.5” inches and click apply.
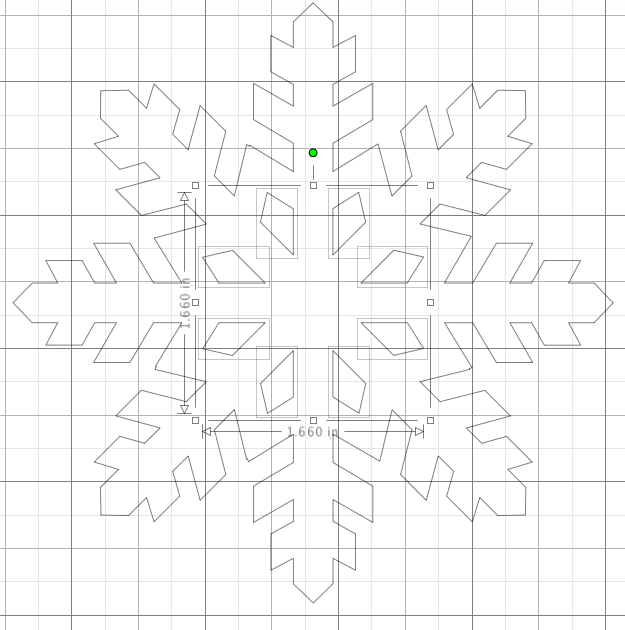
- Select the snowflake again. Right click, and select to “Release Compound Path”.

- Select all the middle diamond shapes and delete them (we’re going to replace them with the nativity scene).

- From the left menu bar, select the ‘Draw an Elipse’ tool.

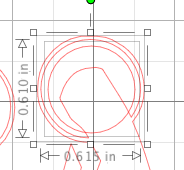
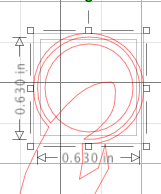
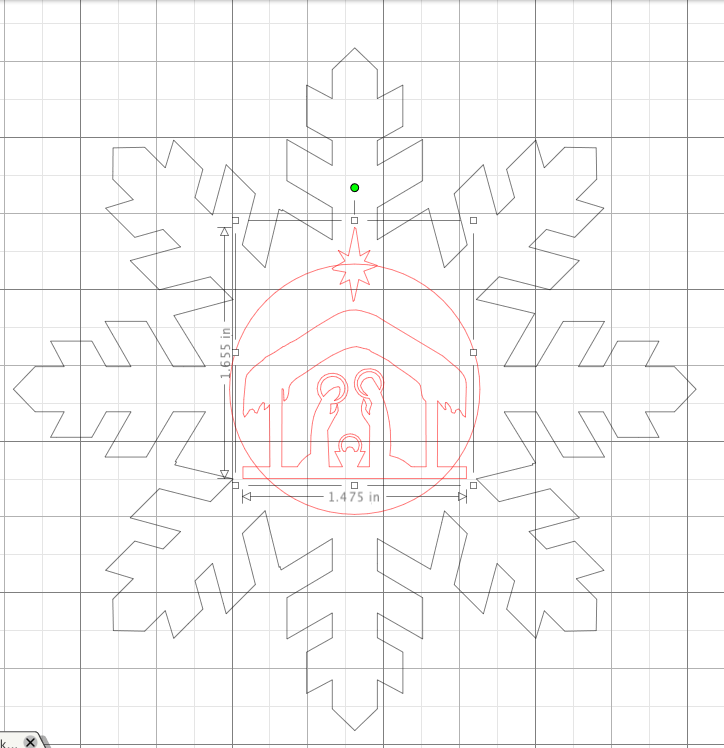
- Hold down the shift key and drag to make a 1.65 x 1.65 inch circle (if the circle you drag out is not exactly 1.65 x 1.65 inches, you can change the size precisely in the scale window like we did in step X with the snowflake).
- Select your circle and your snowflake (by clicking on one, holding down the shift key, and clicking on the other).
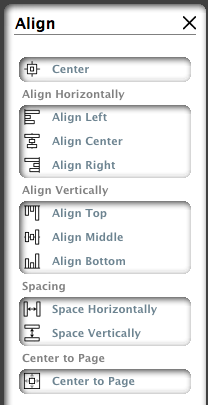
- In your top navigation bar, select the ‘Open the Align Window’ button.
- Chose to align these two objects horizontally by choosing the “align center” from the list and to align them vertically by choosing the “align middle” from the second list (or alternatively just click the “Center” button at the very top of this window. I just showed the two step process so you know how these two things work).
- Deselect the snowflake and circle by clicking anywhere else on the background of your cut file preview.
- From the left menu bar, select the ‘text’ tool.

- In the ‘Text Style’ window that pops up on the right, change your font to ‘sl Christmas Silhouettes’. Change the text size to ‘200.0pt’. On your cut file preview, enter the text ‘cd’.
- Right click on the dingbat nativities text that shows up, and select to ‘ungroup’.
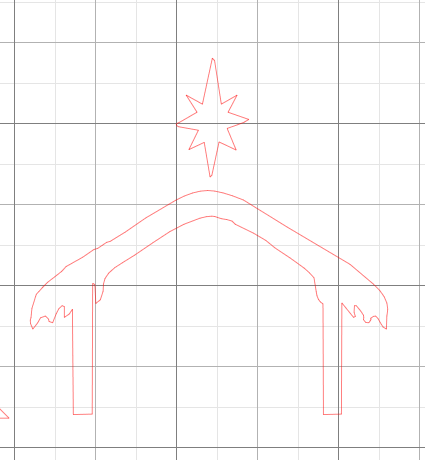
- On the nativity with creche, delete the inside of the star. Delete the Mary, Joseph, and baby Jesus under the creche (this is a preference thing. I like the other Mary, Joseph and baby Jesus better. You could skip this step).

- OK, Here are a few more “preference” steps. You can choose to skip these steps, but I’m not sure the halos would cut well. I’m doing them because I’m afraid those halos wouldn’t cut that thin, and I think the roof of the creche looks a bit thin and plain:
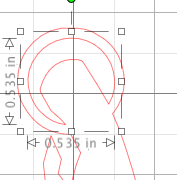
- Draw a .535 inch circle and align it just inside the inner ring of Joseph’s halo. select the inside of Joseph’s halo and your new circle. From the top menu bar, select to ‘Open the Modify Window’.

- Select the ‘Intersect’ option.
- Draw a .545 inch circle and align it just inside the inner ring of Mary’s halo. select the inside of Mary’s halo and your new circle. From the top menu bar, select to ‘Open the Modify Window’. Select the ‘Intersect’ option.

- Draw a .40 inch circle and align it just inside the inner ring of baby Jesus’ halo. select the inside of baby Jesus’ halo and your new circle. From the top menu bar, select to ‘Open the Modify Window’. Select the ‘Intersect’ option.


- Select the creche. Zoom in so that the creche takes up most of your screen. From the left menu, select the ‘edit points’ button. Holding down the shift key, click each of the little grey square points on the bottom of the creche to select them. They should turn white as you click each point. Without clicking anything else, hold down the down arrow on your keyboard to move all these points down. This will make the top of the creche “wider”.


- Zoom back out.
- Select Mary, Joseph, and baby Jesus and group them (object—> group from the main menu), then drag them under the creche.
- Open the Scale Window and resize Jesus, Mary, and baby Jesus to 1.160 x 0.990 inches.

- From the left menu, select the ‘draw a rectangle’ button. Draw a rectangle that is 2.210 x 0.115 inches (using the scale window as needed to be precise).
- Select the new rectangle, the creche, the star, and the Jesus, Mary, and Joseph group and open the align window and align them horizontally choosing “align center”.

- Make sure the rectangle is right along the base of Jesus, Mary, Joseph, and the Creche (but overlapping). Select the Jesus, Mary, and Joseph group and temporarily ungroup them. Select the outer parts of these three (NOT their inner halo lines), the creche and the bottom base rectangle, and from the top menu bar, open the modify window, and select to weld these shapes together.

- Now select the whole nativity and the star and group everything so we can move it easily.
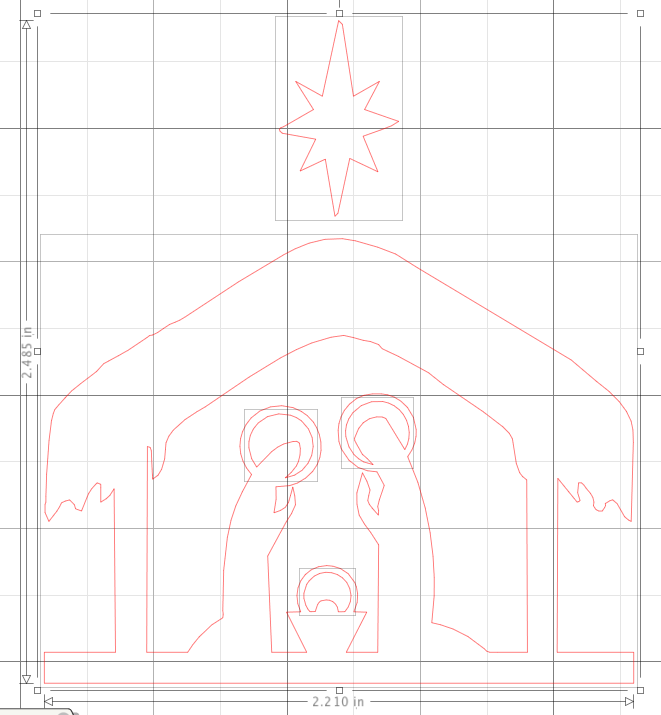
- Move this group into the center of the circle inside our snowflake and resize the group to 1.475 x 1.655 inches.
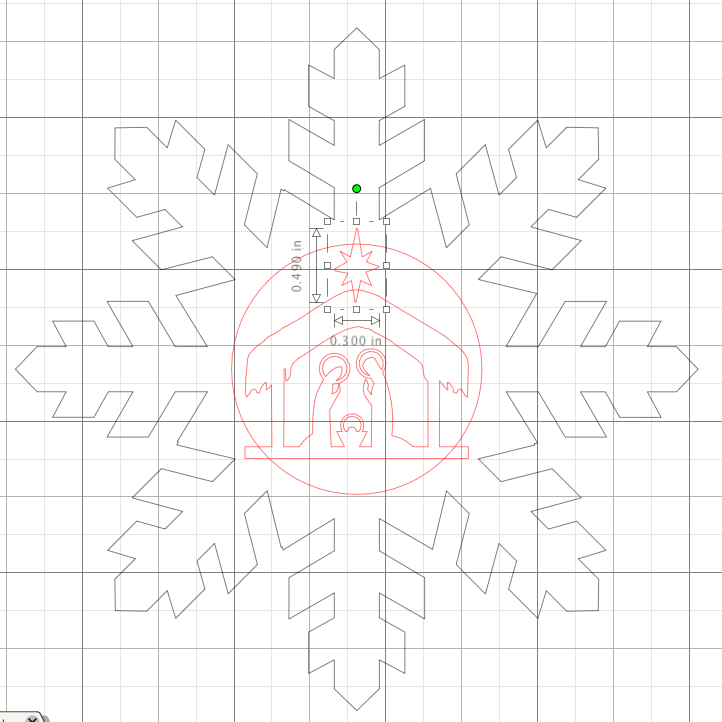
- Right click on our nativity group and temporarily ungroup everything again. Move the star down so that it intersects both the snowflake circle and the top of the creche.
- Select snowflake and the circle. Open the modify window and select ‘subtract’.

- Select the creche, the star, and the snowflake object. Open the modify window and select ‘weld’.

- OPTIONAL: I wanted a TINY bit more detail so I added a few more stars inside the top of my creche from shapes I had in my Silhouette library.
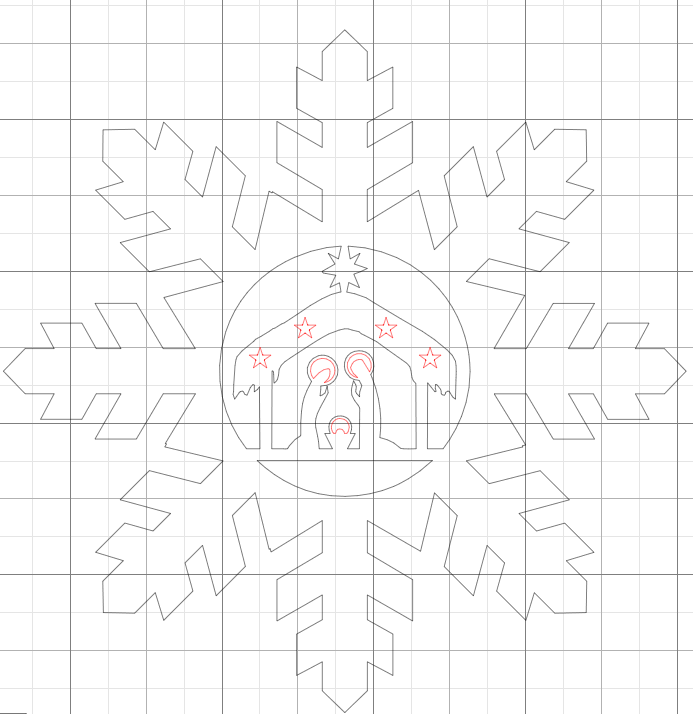
- Go to Edit —> Select All in your Main Menu and then group everything so things cut in the correct order.
YOU DID IT! See? That wasn’t so bad! And just in case you did’t make it through the steps, follow this link to download my cut file!
PART 2: 'WORDY INSERTS' CUT FILES
Process Steps:
TO BUILD CUTOUT WORDS AND PHRASES INSERTS: Figure out how large you want your final cut out to be. For example, I’m designing for a SNAP album, so my pages need to be 6.75 inches by 8 inches including the hole punch area (measure twice, cut once… trust me! I totally made my first cut page 6x8 because I forgot to account for the hole punched area. It’s best to just measure one of your plastic sheets to determine size).- Open a new file in Silhouette Studio. Save the file as ‘Wish_MERRY_insert.studio’
- Select the ‘Draw a Rectangle’ tool from the left menu bar and draw out a rectangle that is the appropriate size (for the purposes of this tutorial, I’m going to assume you’re also designing for a SNAP album so my sizes will match my own): 6.75 x 8 inches (if you don’t make your rectangle precisely sized at first, you can enter the size explicitly by selecting the ‘open the scale window’ button in the top menu bar and specifying the exact dimensions and hitting apply.
- CREATE A BORDER
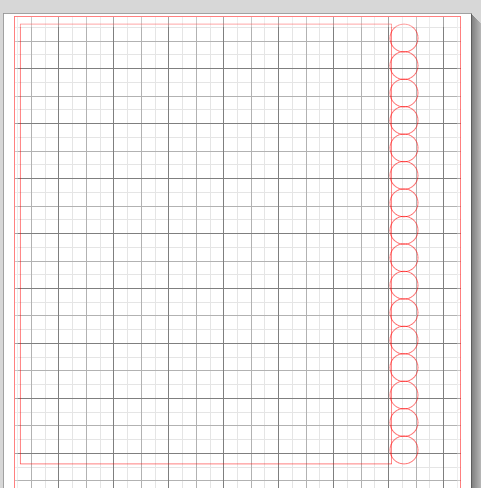
- Create a decorative scalloped border on your page by drawing out a .510 x .510 circle on your page. duplicate it 16 times.
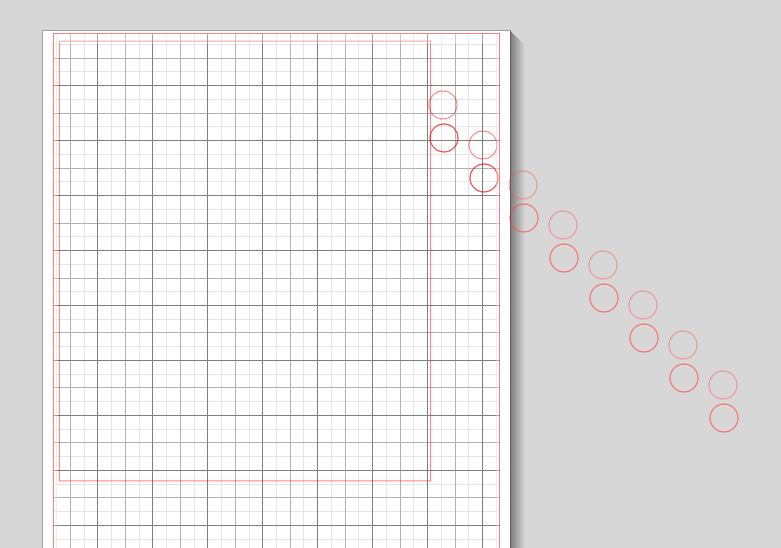
- From the top menu bar, select the ‘open the align window’ button and select the first circle and your big rectangle. Align them vertically at the top.
- Select the last circle and your big rectangle. Align the vertically at the bottom.

- Select all 16 circles and align them left,

- Then choose to space them vertically.
- Move the circles over to the left using your arrow key so that they are centered over the right hand side of the large rectangle you drew out.
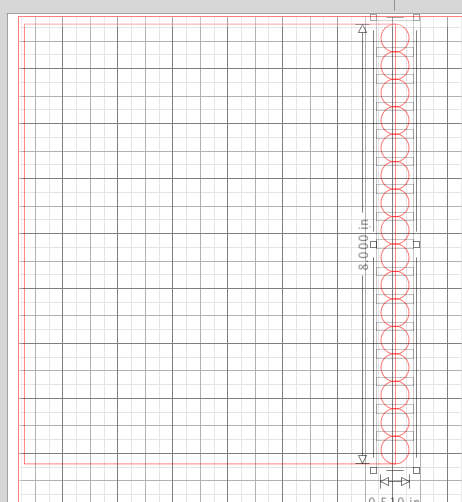
- Select the rectangle and the 16 circles, select the ‘open the modify window’ button from your top menu bar and chose the ‘weld’ option.
- ADD WORDS
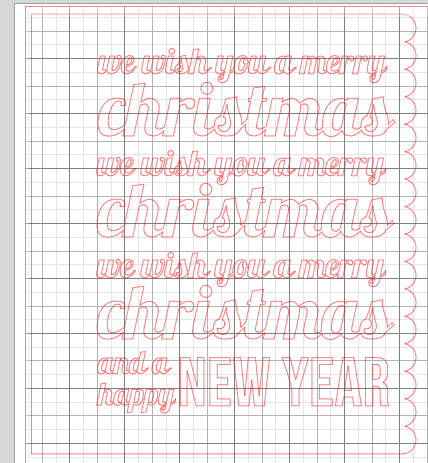
- From the left menu bar, select the text tool and chose a font you like in the text style window (I chose Lobster 1.3) and change the font size to 46.5. Type out your first line of text: “we wish you a merry”.
- Move the line of text you just created so that the right hand side is approximately 0.25 inches away from the narrowest part of your border.
- Select the text tool again and click under your first line and type your second line of text: “christmas”.
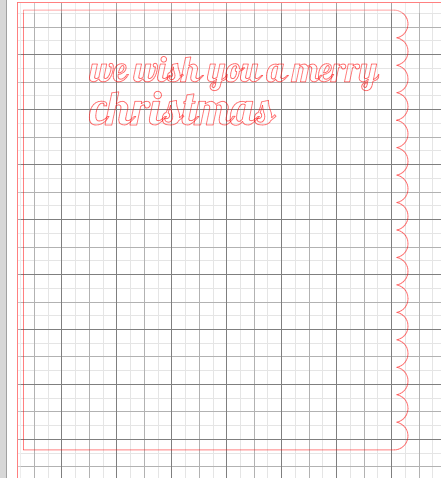
- Hover over the top right corner of the text box (over the little white square in the top right corner). Your mouse should look like a diagonal line with arrows on either end. Hold down the shift key, click, and drag up and to the right until your “christmas” text lines up with your “we wish you a merry” text.
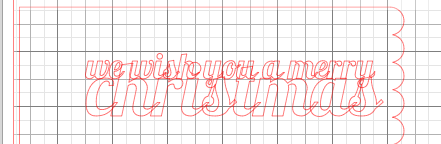
- move the word ‘christmas’ down so it’s not right on top of your first line.
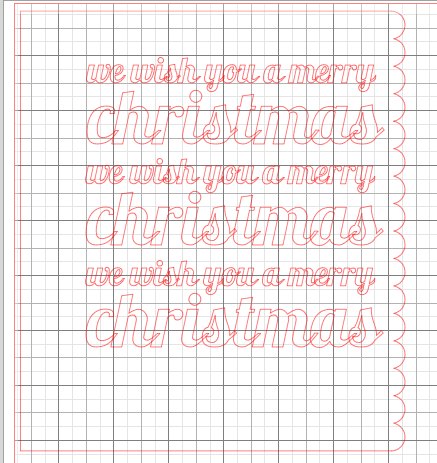
- Select your first two lines and copy them and paste them directly below your first two lines (since the song repeats).
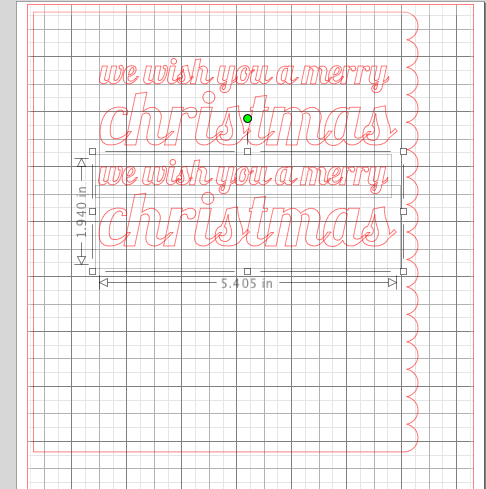
- Repeat step 6 a second time.
- select the text tool again and click under your last word ‘christmas’ to type the next line: “and a happy”
- I’m going to change the font of New Year to be an all caps font, so I’m putting a carriage return after “and a” to move “happy” down to the next line. This adds a bit of visual interest.
- Select the font tool again, change your font to an all caps font that mixes well with your first font. I chose ‘Bebas Neue’ and typed out ‘new year’.
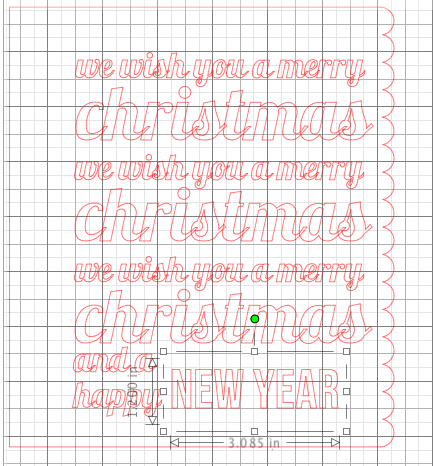
- I moved my ‘New Year’ text over, and clicked the upper right hand corner of the text to scale it, held down the shift key and dragged up and to the right to make New Year line up on the right with all my other text. It didn’t line up quite perfectly because I wanted “and a happy” and “new year” to be the same height.
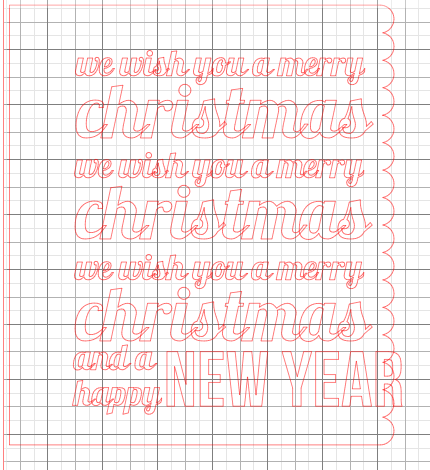
- So now I selected BOTH of these two text pieces and resized them together to fit in on the right with the above lines.

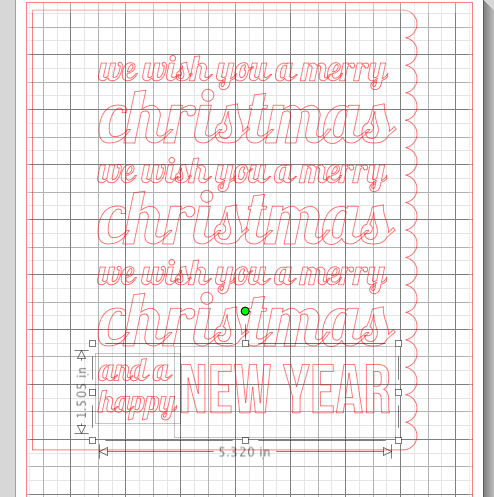
- Now select all your text pieces, select the ‘open modify window’ button in the top menu bar, and select to ‘weld’ these pieces.
- Select all your text again. Scoot it all up a bit so that there is equal spacing above the quote as below (distance between “we wish…” and the top of the rectangle cut out is the same as the distance between the “… happy new year” and the bottom of the rectangle cut out).
- Go to Edit —> Select All in your Main Menu and then group everything so things cut in the correct order. I cut mine at this point and did the hole punches manually. You could add them if you measure for them and know exactly where to put them on your cut file. I thought it’d be easier to do it after :)
YOU DID IT! See? That wasn’t so bad! And just in case you did’t make it through the steps, follow this link to download my cut file!
0 comments:
Post a Comment