
I tell you all this because my mind is one that constantly thinks about “a better, more efficient” way of doing things. I am always trying to figure out what the “bottom line” process is behind something I’m doing and use my own experiences and those of others to build a general model in my head for how to best get things done.
With that said, I’m a FIRM believer that everyone needs to develop their own scrapbooking style and specific creative process that works for them - HOWEVER - I also believe that there is an underlying basic process flow that is and should be common for everyone.
In this post, I’ll talk about what I see as the key steps to developing a Project Life page (or any scrapbooking page for that matter) AND go over some specifics of my personal process (tools I use, inspiration sources, etc.) that is “easy” enough for me personally to keep up with almost-daily Project Life pages. I'll use an example of one of my pages and talk about how I followed my process to develop that page. Regardless of the details of your process, I believe the basic stages of the scrapbooking process boil down to:
- Capture.
- Plan.
- Learn.
- Execute.
- Reflect.
Stage 1. CAPTURE your stories.
The first step of any scrapbooking process is of course to capture your images and journaling. I’d say that the heart of this activity is actually capturing your STORIES using photos, ephemera, and journaling. As many who have scrapped for years know, if you look at the “capture” phase from this perspective from the get go, you start to take pictures differently and record your activities differently. It makes the later stages of the process MUCH easier if you are constantly thinking about what stories you want to tell about your day/week/month as you collect.MY PROCESS:
Since I do digital Project Life, I’m always looking for ways to capture everything electronically from the beginning so that I don’t have to constantly re-do things (like transfer hand-written notes into the computer at a later date.Photos:
I capture all my photos with a digital camera. I either use my Canon PowerShot SX40 HS, 12.1 Megapixel, with 35x optical zoom, or I use my trusty iPhone :) The phone has the advantage of always being with me and synching automatically to my Mac over iCloud, but of course the images aren’t as great… especially in low light like we have inside my house.Ephemera:
I try to capture things like my son’s artwork digitally as well by either taking a photograph or (a lot less frequently actually) scanning the item. You could scan a ton of ephemera (like movie tickets, hospital bracelets, etc.) if you wanted to. I personally haven’t really gotten into this yet, but have a box full of “baby keepsakes” that I’d eventually love to do this with when I finally get around to documenting a “baby album” for either one of my sons.Journaling:
For me this step is CRITICAL since I’m scrapping 1 month out. I can hardly remember what I ate for breakfast this morning. I could NEVER remember what happened a month ago if I didn’t document AS THINGS HAPPEN. I have done a lot of research and searching to find something that would help me capture journaling in a single location “on the go”. I finally settled on a journaling tool and I am IN LOVE with DayOne. It’s a journaling app for the Mac and iPhone. I love that it synchs between devices automatically, that it allows me to record one or more entries for a given day and and that I can quickly see a calendar or list overview of my journal entries (see image to right). I particularly LOVE that I can use my microphone on my iPhone to quickly verbally record a story, event, or note and have it convert into text that I can later copy and paste directly into my photoshop page spread! I record entries daily. Sometimes they have the full text of a story and are in full sentences like the entry below for February 17th below. Other times I just record prompts and sentence fragments so that I can remember what to write about later when I figure out how much journaling space I have on my layout. :)
Stage 2. PLAN your spread.
Some people are fairly spontaneous about scrapbooking. They do simple planning: they grab a grid or template that matches the number and orientation of their photos, and they’re off to the races. I don’t know about you, but I’m an uber-planner. For me, planning involves thinking through my layout to group stories, balance color and visual weight, and create my own grid that matches my need for 10 million photos per layout ;) There are probably a ton of other things I SHOULD be considering when I plan. A lot of people just try to keep in mind basic core design principles (contrast, repetition, alignment, proximity) and elements of good design (line, color, shape, size, space). I’m sure you are thinking of even more examples that I haven’t listed here. In fact, I’d love for you to share what things YOU think about when planning a page!MY PROCESS:
Maybe I’m just a bit OCD, but I break out my graph paper for EVERY Project Life layout before I ever open Photoshop. In fact, I have a dedicated Project Life notebook. I typically plan out multiple pages at a time (usually 5 pages) logistically so that I know what photos I’m using, what stories I’m telling, and how I can compress all of that into a 12x12 grid.First, I identify my favorite photos from a given day in iPhoto by flagging my favorite photos in a Smart Album for that date. Below is a sample of my "smart album" for my 2/17/14 spread. I create a Smart Album for each page I make to help me sort photos on the fly.

You create Smart Albums by filtering by “metadata” - things like if the photo is flagged, rated a certain number of stars, filter by date range, keyword, event, etc. You can even select multiple filter criteria at once. If you've never used Smart Albums, check out the cool video tutorial Cathy Zielske made on how to use and create your Smart Albums. Here are my conditions / criteria for filtering the images in my Smart Album for 2/17/14:
 Once I've identified my photos, I make quick “story groupings” on my graph paper to the right of my 12x12 grid space to tell myself which photos “go together” for collage style cards or which cards need to be next to each other. I sometimes draw a stick figure representation of the photograph on these mini mockups so that I can be sure that the scale of various images are going to work well next to each other.
In the below image of my graph paper planning page for 2/17 and 2/18, you can see the stick figure representation I made of Evan under the cover in his jumperoo to remind myself which way he was facing in the photo so that I could have him facing into the page when I positioned this image in my layout. I also made a story grouping of the grocery trip that I took on 2/18 so that I could plan out how these four square photos from the event (the groceries I bought that day on the conveyer belt, Cameron in the groceries cart, the computer screen that showed the final total $ of my bill, and my Suburban's trunk nearly overflowing with groceries once we loaded everything in) were near each other to tell a cohesive story in my layout.

Once I've looked at the number and orientation of photos and story groupings that I have, I determine how to best fit everything into a logical 12x12 grid and attempt to leave room for date cards, journaling and OCCASIONALLY the elusive filler/quote card! :) It always seems I run out of room for these - as much as I love the look of them and the visual “break” that they provide. I always have too many stories and photos that I want to document! Miraculously, my 2/17 layout plan included spaces for TWO filler/quote cards, a journal card, and a date card! I think this may have been a record for me!
Once I’ve identified a basic layout, I begin trying to figure out the details: is my photo going to be on a mat? What is the layout of my collage card? What is the layout of my “filler” card? Sometimes an immediate idea hits me, and I document that during the ‘plan’ stage. More often than not, I actually begin to move into the ‘learn’ stage at this point as I begin searching for inspiration for a specific card layout.
In my 2/17 layout, I wanted to add some dimensionality and interest to my page by matting and embellishing my picture of the flowers (top middle card) and my picture of Cameron "hiding" his puzzle pieces (lower left). I also have been wanting to use watercolor backgrounds to quotes or photo spreads for a while and wanted to find a free resource that I could use for this.
Stage 3. LEARN new techniques, styles, and layouts.
It is so fun and exciting to learn new things about digital scrapbooking. The great news is that there are ideas, tutorials, and inspiration everywhere! You can find inspiration from other Project Lifers, traditional scrappers, card makers, and more in galleries, forums, pinterest, and more.MY PROCESS:
When I am considering a new PL layout, I try to think about how I am going to use the page to try to teach myself something new. Sometimes that “something new” is a new technique (such as digital watercolor "painting" - I tried it here). Other times, I focus on something like improving my photography editing skills following tutorials such as this video lesson from Phlearn and this "photo rescue" tutorial from vanilla tree photography and/or using actions from the coffee shop blog (here's a layout where I focused mostly on learning how to modify my photos).And even more basically, sometimes it’s just pushing myself to do a new layout for a filler card or image collage card that I make myself in Photoshop based on amazing inspiration from other scrappers, paper crafters, or graphic designers/artists.
For my 2/17 layout, I found some AMAZING free high resolution watercolor textures on the "lost and taken" blog and used both the original files and recolored versions in my final spread. My flower card was inspired by a card layout I saw on Pinterest that I can't find anymore. I should have written this down, but I didn't that day. I was inspired by a few of Traci Reed's cards for the Cameron's puzzle piece layout.
In addition to searching for inspiration for a specific layout, I make sure to take time each day to troll Pinterest, Facebook, Scrapbook.com, Sweet Shoppe, and TinyPrints (to name a few!) to look for new ideas, tutorials, etc. that might inspire future layouts. I pin my favorites on my various Pinterest inspiration boards daily.
Stage 4. EXECUTE your plan.
This is where the rubber meets the road, where you get down into the nitty gritty of trying a new technique, applying a layout, and completing a page. If you’ve done steps 1-3, this step doesn’t need much explanation and is really just filling in the blanks of the idea you’ve already formed. Of course, once you start executing, you probably realizee a few things in your design might need a bit of tweaking. Just don’t get too hung up on everything being perfect. Remember: each page is documenting a story and is teaching you something new. Therefore, each page just makes you that much better for NEXT time. Don’t get too caught up re-working.MY PROCESS:
When I actually create my page, I add my photos to the layout first. A lot of times I use a Da Vinci golden ratio spiral to make sure my photos are cropped in focus. Then I edit my photos using adjustment layers masked over each photo so that I don't lose my original photo and so that I can further modify things once all the elements are in place (ex: sometimes once the spread is complete, I realize the photos need to be a bit brighter to stand out).Next I start building up my sketched layout digitally. I create my "layers" of paper using Photoshop shapes in solid colors just to get a feel for what items will be where; kind of like a Cindy Schneider layered template (I'll have to take a screenshot on my next layout).
Once I'm happy with the layout, I start adding my papers (using clipping masks to "cut" them into my layout and elements. I love being able to try multiple things to make sure that the layout and colors are balanced on the page. I document the products I'm using as I go right in my Project Life planning notebook alongside my page sketch (see my planning image) so that I can give proper credit when I post my page. I try to keep in mind that my work that I post to galleries is my way of giving back to the awesome designers of the scrapbooking products I use. I'm advertising for them in a way by posting gallery images using their products so I should give credit where it's due and let everyone know how much I enjoy their products.
In my 2/17 layout, I was able to modify a journal card from Cindy's Layered Cards: Winter 2 by Cindy Schneider (I removed her "winter" circle and added my own embellishments), a filler card from Cindy's Layered Cards: EVERYDAY 7 by Cindy Schneider, and a freebie filler card from Cindy Schneider. I am using Papers and elements from "[every day] just february" kit from Lauren Grier for the entire month of February to keep a consistent color scheme and "feel" to the month's layouts. I also used one of the watercolor textures from "lost and taken” blog mentioned earlier. Finally, I used solid paper & a re-colored arrow from Sugarplum's “life in real color” collection, and Sugarplum's Today's the Day: Essentials kit word art tag. I created my own date card.
Sometimes when I'm putting things together, I realize something in my plan doesn't work quite the way I had hoped. When I pulled the photograph of my plastic Target bag into Photoshop I had to do quite a bit of 'distort' transformation to get the pattern to look straight. I realized that no matter how I adjusted the image it just didn't look right as a patterned card all by itself. Luckily, I had recently seen a funny comic on Facebook about how you walk into target for one thing, get hypnotized by the red target "eye" and decide you really NEED those curtains and somehow an entire cart full of merchandise... $500 later, you walk out to the parking lot wondering what the heck happened. I added this to my card with some quick grounding elements.
If you’re anything like me, sometimes you have to walk away from the page for a bit mid-stream and come back with fresh eyes to make sure that you’re not wildly off track :) But I always try to let go of one page to move on to the next.
So here's a final cut at what I came up with for my 2/17 layout after executing my plan:
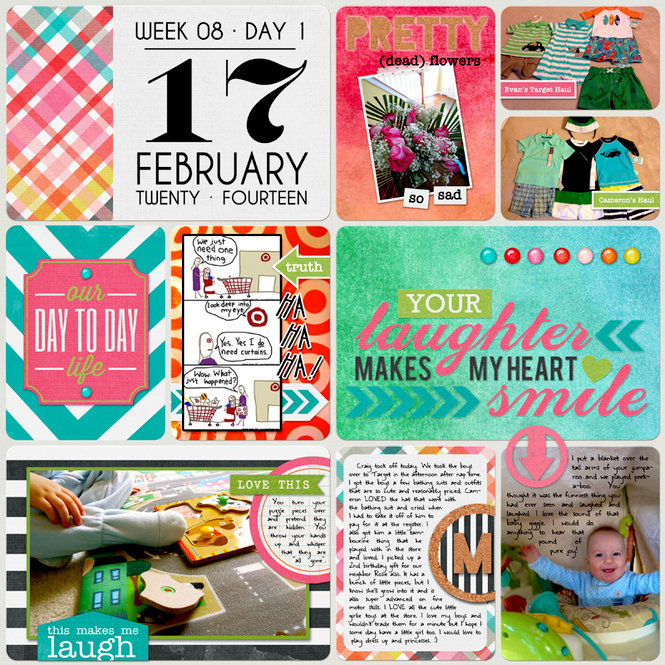
Stage 5. REFLECT on your work.
This “letting go” of a page shouldn’t be confused with not learning from my mistakes. I try to look back at a page, process what I learned, think about what seemed to work well and what seems to need improvement and work that into my next layout. Not every layout will be my favorite, and I’m OK with that. It’s just another learning opportunity and in order to capitalize on that opportunity, I try to take a bit of time to clearly articulate (to myself) what I learned creating each page.Reflecting not only helps me let go of a completed page; it also helps inspire me to start the cycle again. It gives me a “call to action” for things I can work on next time as I CAPTURE and PLAN tomorrow’s pages.
My 2/17 page allowed me to explore using watercolor backgrounds and how to best recolor existing textures. I learned that sometimes matting pictures with textured or patterned background papers really adds more pop to your pages and doesn't distract from your images like I was always afraid of before completing this page. I experimented with making simple modifications to card templates that I had purchased that were in a specific theme making them into something much more generic. I learned that I like the look of an off-kilter image with word labels that look like stickers you stuck on and got a bit crooked. I taught myself how to add shadows to washi tape with the dodge and burn tools to make them look more realistic. Looking back at my layout (and my other layouts) after a few weeks. I think I can and should work harder to have a bit more white space on my pages or areas for the eye to rest. Although I tend to use a lot of colors on my own pages, I'm always drawn to others pages who use fewer colors per page or have one color that stands out from the rest. I need to get better at following the "gallon, quart, pint" rule of design. What else do you think that I could improve upon? Constructive feedback is always welcome!
So that wraps up my understanding of the digital scrapbooking Project Life process. I hope this inspires you to recognize your own process details as you Capture. Plan. Learn. Execute. & Reflect. upon your next layout!
Stay tuned for next Thursday night's post where I will show off my full months worth of completed pages for January and February and get a sneak peek on my theme for all my March layouts!
WHAT DO YOU THINK?
What’s your process like? What stages and specific steps do you follow? What tools work best for you to help expedite the process?P.S. Apologies that this post was a day late this week - I had a LOT to say and didn't want to rush something out the door until I had my ideas fully realized in this post.
0 comments:
Post a Comment